Tag: can’t open

Open a Holden with a Dead Key Fob

How to Open a Holden with a Dead Key Fob

Getting into Your Holden

  • But first, if you are already inside, click here for help getting started!
  • Second, you’ll find video help here!
  • Finally, if you need or want another manufacturer, click here.

Retrieving the mechanical key

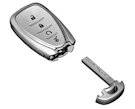
Holden flip keyHolden uses three key fob or transmitter styles. To get in the vehicle when the key fob battery is dead, a mechanical key will have to retrieved from the fob and used to unlock the car.

The first is a simple flip key (above right). Press the unmarked button to extend the mechanical key. It remains attached to the key fob. Use the mechanical key to unlock the driver’s door.

Holden remote controlHolden transmitterThe next two (shown to the right) feature a removable mechanical key and are quite similar (one has more buttons than the other). Each has a button on the side of the transmitter (remote control or ‘clicker’) near the key ring end. Press the button, as shown, and pull the key out.

Getting Inside

If a key hole is visible at the back of the driver’s door handle, simply insert the mechanical and turn, and you’re in.

Holden door handle 1The CommodoreAcadia and and Equinox models are hiding their key holes behind a cover at the back of the driver’s door handle. To remove the cap on the Acadia and Equinox, pull the door handle out to the open position. Insert the key into the slot on the bottom of the cap (number 3, right).

Push it as far upwards as possible and hold some upward pressure. Then pry outward. And yes, you WILL feel like you are prying off a piece of your car! Move the cap rearward revealing the key cylinder. Now the mechanical key can be used in the cylinder.

To replace the cap, insert the two tabs at the back of the cap between the black seal and the metal base. Pull the door handle out to the door open position and move the cap forward and press to snap it into place. You can then release the door handle.

Holden door handle 2The cap on the Commodore is slightly different but there is still a slot under the cap. Insert the mechanical key into the slot and again hold upward pressure. Then rotate the key upward until the cap comes away.

To replace the cap, insert it with the lower side in the recesses. The rotate it upwards and push it until the cap engages at the upper side.

Remember, getting in the car is most important. If you have difficulty replacing the cap, don’t. Let your dealer do it when you get a new battery for your Key FOB!

Continue to Part II, Getting Started …

——————————————————————-

Remember that only proper service and repair procedures will ensure the safe and reliable operation of your car. In addition, proper safety procedures and precautions, such as the  use of safety goggles, the right tools and the equipment should be followed at all times to eliminate the possibility of personal injury or improper service which could damage the vehicle or compromise its safety.

These posts are for information sharing purposes only, and should not be used in lieu of an OEM service manual or factory authorized service procedure. We are not in the auto repair business nor do we publish automotive service manuals. Nothing we include on these pages and posts has been reviewed, approved or authorized by any vehicle manufacturer.

Technology is always changing and what is current and accurate today may be literally out-of-date and inaccurate tomorrow. And when it comes to the current state of flux in the auto industry, nothing is more true.

Permanent link to this article: https://dashboardsymbols.com/2020/10/holden-dead-key-fob-help-part-i-getting-in/

Start an Alfa Romeo with a Dead Key Fob

How to Start an Alfa Romeo with a Dead Key Fob

Alpha back upTo start your Alfa Romeo Giulia, Stelvio or Tonale with a dead key fob battery, you will need a back up location to place the fob. For the first two models, it can be found in the center console.

Clear away anything cluttering the bottom of the console. You should then see the outline of the key fob on the floor (right) with lines radiating from the top.  These are meant to indicate radio waves.

Tonale back up startIn the Tonale, the spot is in the front cup holder, as shown to the right. There is no marking we are aware of.

Place the fob on the spot. The car will recognize the fob even though the fob’s internal battery is dead and will start normally. The key fob can be removed once the car is started.

Note that Alfa Romeo says that to shut down the engine when the fob’s battery is dead, you will need to press and hold the Start / Stop button for several seconds. We’ve not seen this in any other vehicle…

Click here for video help!

… Return to Part I, Getting In

——————————————————————-

Remember that only proper service and repair procedures will ensure the safe and reliable operation of your car. In addition, proper safety procedures and precautions, such as the  use of safety goggles, the right tools and the equipment should be followed at all times to eliminate the possibility of personal injury or improper service which could damage the vehicle or compromise its safety.

These posts are for information sharing purposes only, and should not be used in lieu of an OEM service manual or factory authorized service procedure. We are not in the auto repair business nor do we publish automotive service manuals. Nothing we include on these pages and posts has been reviewed, approved or authorized by any vehicle manufacturer.

Technology is always changing and what is current and accurate today may be literally out-of-date and inaccurate tomorrow. And when it comes to the current state of flux in the auto industry, nothing is more true.

Permanent link to this article: https://dashboardsymbols.com/2018/12/alfa-romeo-dead-key-fob-help-part-ii-getting-started/

Start a Mitsubishi with a Dead Key Fob

How to Start a Mitsubishi with a Dead Key Fob

Starting Your Mitsubishi

Starting a Mitsubishi will depend on whether or not there is an actual Start / Stop button. If there is, continue below.

Push Button Start

Mitsubishi back up startNewer Mitsubishi models use a Start / Stop button. With the newest models, built roughly 2018 and later, simply press the the Start / Stop ignition button with the back of the key fob, as shown to the right, while stepping on the brake. The key fob or FAST key will be recognized and the car will start.

We have video help here!

Glove box slotIn earlier models, there will be a slot to accept the FAST key fob. It may be inside the glove box (right) or somewhere near the front of the console (below). Early Outlander models are the only ones we are aware of that has a slot in the glove box, although later models also use a slot near the console. See examples below.

Mitsubishi shogun back upIn other models, the back up slots will be found somewhere on the dashboard, generally in the vicinity of and in front of the shifter. We did find one model, sold outside North America, the Shogun, where the slot is actually alongside the console, as seen to the right. Wherever the slot is, it will look like a small rectangular opening just the right size for the key fob. You may be using it for business cards or coins! Remove them!

Mitsubishi back up 2Mitsu slot 3Mitsu slot 2Once found, insert the FAST key fob into the slot. The engine can then be started normally, stepping on the brake while pressing the Start / Stop ignition button. Mitsubishi recommends removing the key fob once the vehicle is started.

Keyless Turn Knob Start

Mitsubishi Key AssembledIf there is a keyless turn knob, on the steering column, it is a three step process however. Start by slipping the back end of the mechanical or emergency key into the FAST key fob. It will then look like the illustration and the feel of a more traditional ignition key (right).

Ignition cylinder coverThis assembled key will be needed to turn the ignition switch, which is hiding under the turn knob on the steering column. When the key elements are assembled, the transponder is close enough to the switch’s antenna module to be recognized. The module supplies the power when the key’s battery is discharged.

Mitsubishi Emergency StartRemove the ignition knob cover (above right) by pushing the lock release buttons on the each side. Then insert the emergency key into the now exposed lock cylinder (right). The vehicle can now be started in a traditional key-start manner by pushing, then turning the key. See the illustrations.

Note: If you have made an attempt to start the vehicle without success, there may be residual pressure in the brake system and a new warning light may appear (left) or text Engine Start Operation Indicatormessage to Step on the Brake. Press the brake pedal very, very hard when trying to start the vehicle again to be sure that the release switch behind the pedal is engaged. Or wait a few minutes and try again.

… Return to Part I, Getting In

——————————————————————-

Remember that only proper service and repair procedures will ensure the safe and reliable operation of your car. In addition, proper safety procedures and precautions, such as the  use of safety goggles, the right tools and the equipment should be followed at all times to eliminate the possibility of personal injury or improper service which could damage the vehicle or compromise its safety.

These posts are for information sharing purposes only, and should not be used in lieu of an OEM service manual or factory authorized service procedure. We are not in the auto repair business nor do we publish automotive service manuals. Nothing we include on these pages and posts has been reviewed, approved or authorized by any vehicle manufacturer.

Technology is always changing and what is current and accurate today may be literally out-of-date and inaccurate tomorrow. And when it comes to the current state of flux in the auto industry, nothing is more true.

Permanent link to this article: https://dashboardsymbols.com/2018/12/mitsubishi-dead-key-fob-help-part-ii-getting-started/

Open Chevrolet Models with a Dead Key Fob

How to Open Chevrolet Models with a Dead Key Fob

Retrieving the mechanical key

GM makes three key GM Key Style 1fob (remote control or ‘clicker’) styles, and Chevrolet uses them all. To get in the vehicle when the key fob battery is dead, a mechanical key will have to retrieved from the fob and used to unlock the car.

For the rectangular style fob or transmitter press the thin button near the bottom of the transmitter (remote control or ‘clicker’) used to remove the mechanical key. Do not pull the mechanical key out without pressing the button.

GM Key Style 2In next style is a flip key, shown to the left, press the unmarked chrome button to extend the mechanical key. It remains attached to the key fob. Use the mechanical key to unlock the driver’s door.

GM Style 3The final rounded style key fob is similar to the rectangular fob, in that the mechanical key is removed from the fob for use getting into the vehicle. However, it is similar in appearance to Style 2. To remove the mechanical key, press the button on the side of the transmitter near the key ring, as shown, and pull the key out.

Getting Inside

If a key hole is visible at the back of the driver’s door handle, simply insert the mechanical and turn, and you’re in.

Beginning with the 6th generation Corvette introduced in 2005 and adding the Cadillac CTS and ELR Coupes, no external door handle is obvious, and thus no backup entrance option. See below.

Then in the 2013, the Chevrolet Impala and followed by eight additional models the by 2017, the key hole was hidden. Sadly, more and more General Motors products will likely feature this unnecessary change going forward.

Impala, Tahoe, Suburban, Malibu, Cruze, Camaro, Volt, Bolt

GM Lock Cover RemoveChevrolet models with traditional door handles but no obvious key holes or lock cylinders, hide the key holes under a cap at the back of the driver’s door. They include the Impala, Tahoe, Suburban, Malibu, Cruze, Camaro and Volt as well as new Bolt model. To remove the cap, pull the door handle out to the open position. Insert the key into the slot on the bottom of the cap (“3”, right).

Push it as far upwards as possible and hold that upward pressure. Then pry outward. And yes, you WILL feel like you are prying off a piece of your car! Move the cap rearward revealing the key cylinder. Now the mechanical key can be used in the cylinder. Look for a video here to help.

To replace the cap, insert the two tabs at the back of the cap between the black seal and the metal base. Pull the door handle out to the door open position and move the cap forward and press to snap it into place. You can then release the door handle.

Blazer capBlazer EV

The new Blazer EV offers a “twist” on a very similar cap. There is still a slot on the underside of the handle, but the cap is only about a 1/4 inch thick. Insert the mechanical key into the slot and turn it to release the cap. It can then be pulled away.

Blazer cap replaceTo replace the cap, insert it back into the grooves on the door handle. Push down on the cap until it clicks into place.

Remember, getting in the car is most important. If you have difficulty replacing the cap, don’t. Let your dealer do it when you get a new battery for your Key FOB!

Corvette

C8 Corvette lock cylinderCorvette models are a very different animals. The C6 through C8 models have  non-traditional, all electronic  locks, latches and door handles, if they can be called handles at all. The C8 does have a key cylinder, but it is found in the air inlet located on the body, behind and above the left door handle. See the image to the right. Insert the mechanical key and turn to open the car.

Coupe_flush_handleOlder C6 and C7 Corvette models, also have flush door handles (right image) with no key holes at all. They have a very different trick up their sleeves. You must use the mechanical key to open the trunk. The key hole is under the lip of the trunk lid facing the ground.

Corvette Open handleOnce the trunk is open, you will find a release handle. It is along the left wall of the trunk in the  Corvette (right).

Pull this release lever and the driver’s door will unlock, unlatch and open slightly and you’ll be in!

We have videos for the coupes here.

Related: Getting Out!

Continue to Part II, Getting Started …

——————————————————————-

Remember that only proper service and repair procedures will ensure the safe and reliable operation of your car. In addition, proper safety procedures and precautions, such as the  use of safety goggles, the right tools and the equipment should be followed at all times to eliminate the possibility of personal injury or improper service which could damage the vehicle or compromise its safety.

These posts are for information sharing purposes only, and should not be used in lieu of an OEM service manual or factory authorized service procedure. We are not in the auto repair business nor do we publish automotive service manuals. Nothing we include on these pages and posts has been reviewed, approved or authorized by any vehicle manufacturer.

Technology is always changing and what is current and accurate today may be literally out-of-date and inaccurate tomorrow. And when it comes to the current state of flux in the auto industry, nothing is more true.

Permanent link to this article: https://dashboardsymbols.com/2012/04/general-motors-dead-fob-help/