Tag: mechanical key

Start a Nissan or Infiniti with a Dead Key Fob

How to Start a Nissan or Infiniti with a Dead Key Fob

Starting Your Nissan or Infiniti

Nissan Key Port 1Two methods exist in Nissan and Infinity vehicles. Some models use method 1. In this case, insert the Intelligent Key in the port provided. It will be found to the left of the steering column. It might be horizontal (first image) or vertical (second image).

If an attempt is made to start the vehicle with a discharged Intelligent Key, a guide light will illuminate at the port. Insert the key fob with the buttons up in the horizontal Nissan Key Port 2port or with the buttons facing the door in the vertical port. Make sure the key ring side is out.

Once the key fob is inserted, the vehicle can be started as normal by pressing the Start / Stop ignition button while depressing the brake. Note that the port does not recharge the fob’s battery.

Nissan Start StyleIf a port does not exist, method 2 comes into play. Simply touch the ignition switch with the Intelligent Key (a chime will sound). Push the ignition Start / Stop button while depressing the brake pedal within 10 seconds after the chime sounds to start the engine.

Mercedes Start ButtonAnd finally, in the Infiniti QX30, the Start / Stop button appears to ‘float’ above the dashboard. Pull it away exposing the ignition switch. If necessary the tip of the mechanical key can be used as a pry bar.

Please, please, do NOT try this if you do NOT have a tapered key as shown above! Insert the tapered end of the key fob into the switch and turn to start the car old school style.

Note: If you have made an attempt to start the vehicle without success, there may be residual pressure in Use Brake Indicatorthe brake system and a new warning light may appear (left) or text message to Step on the Brake. Press the brake pedal very, very hard when trying to start the vehicle again to be sure that the release switch behind the pedal is engaged. Or wait a few minutes and try again.

Click here for video help with Nissan and Infiniti models and key fobs.

Models examined include 370Z, Altima, Armada, Cube, Frontier, GT-R, Juke, Kicks, Maxima, Murano, NV, Pathfinder, Quest, Rogue, Sentra, Titan, Versa, Xterra, Z, EX, FX, G, JX-35, M, Q40, Q50, Q60, Q70, QX30, QX50, QX55, QX56, QX60, QX70, and QX80.

… Return to Part I, Getting In

——————————————————————-

Remember that only proper service and repair procedures will ensure the safe and reliable operation of your car. In addition, proper safety procedures and precautions, such as the  use of safety goggles, the right tools and the equipment should be followed at all times to eliminate the possibility of personal injury or improper service which could damage the vehicle or compromise its safety.

These posts are for information sharing purposes only, and should not be used in lieu of an OEM service manual or factory authorized service procedure. We are not in the auto repair business nor do we publish automotive service manuals. Nothing we include on these pages and posts has been reviewed, approved or authorized by any vehicle manufacturer.

Technology is always changing and what is current and accurate today may be literally out-of-date and inaccurate tomorrow. And when it comes to the current state of flux in the auto industry, nothing is more true.

Permanent link to this article: https://dashboardsymbols.com/2018/11/nissan-infiniti-dead-key-fob-help-part-ii-getting-started/

Start a BMW or Mini with a Dead Key Fob

How to Start a BMW or Mini with a Dead Key Fob

Starting Your BMW or Mini

BMW Key SlotSome BMW and Mini models already require that the key fob be inserted into the dashboard next to the Start/Stop button. If the key fob battery is dead, the vehicle will recognize the fob when inserted. In “Comfort Access” models, the slot is only needed if the fob’s battery dies, or if electrical interference interrupts the fob’s signal. Insert the fob into the slot and use the Start/Stop button as normal.

For other BMW or Mini models, hold the remote control against the marked area on the steering column and press the Start/Stop button within 10 seconds while depressing the brake.

The process remains the same in the new EV line from BMW, starting with the i4 and iX. However, there are now two additional back up start methods available in these vehicles.

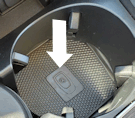
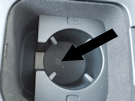
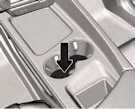
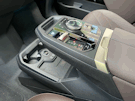
BMX consolei4 charge padThe smart phone recharge pads also act as new start points. A properly connected key card or a smart phone holding the proper BMW app touched to the pads will allow the car to start. The pad is found in front of the cup holders in the i4 (first image) and on the lower level of the iX console (second image).

Note: If you have made an attempt to start the vehicle without success, there may be residual pressure in the brake system and a new warning light may appear (left) or text Use Brake Indicatormessage to Step on the Brake. Press the brake pedal very, very hard when trying to start the vehicle again to be sure that the release switch behind the pedal is engaged. Or wait a few minutes and try again.

Video Help with Your BMW or Mini

There are lots of videos here to help out.

Recharging the Display KeyBMW Display Key

In an automotive first, BMW‘s Display Key (right) actually has a rechargeable battery. The display is automatically disabled when the charge is low, which is a major hint that the device needs to be recharged!

BMW Charge PortThe car features a wireless cell phone charging station inside the center console. There is also a bulge into which the Display Key can be slipped, with the lock button up and out. The Key is charged with a micro USB cable, a micro USB port on the Key (see the arrow on the Display Key) and the USB port at the back of the console.

Related: Getting Out!

… Return to Part I, Getting In

——————————————————————-

Remember that only proper service and repair procedures will ensure the safe and reliable operation of your car. In addition, proper safety procedures and precautions, such as the  use of safety goggles, the right tools and the equipment should be followed at all times to eliminate the possibility of personal injury or improper service which could damage the vehicle or compromise its safety.

These posts are for information sharing purposes only, and should not be used in lieu of an OEM service manual or factory authorized service procedure. We are not in the auto repair business nor do we publish automotive service manuals. Nothing we include on these pages and posts has been reviewed, approved or authorized by any vehicle manufacturer.

Technology is always changing and what is current and accurate today may be literally out-of-date and inaccurate tomorrow. And when it comes to the current state of flux in the auto industry, nothing is more true.

Permanent link to this article: https://dashboardsymbols.com/2018/11/bmw-mini-dead-key-fob-help-part-ii-getting-started/

Open and Start a Maserati with a Dead Key Fob

How to Open and Start a Maserati with a Dead Key Fob

Getting Into Your Maserati

We were first able to get hold of a 2015 Maserati Ghibli. Then in 2017, we had a Levante and were able to verify that this process will work across the product line.

Maserati Key Fob

Retrieving the Mechanical Key

Unlike other manufacturers, the mechanical key, which is in the Maserati key fob, is not connected to the key ring. Looking at the back of the key fob, note the separation on one side only (bottom arrow) which marks the location of the key.

Also Mechanical keynote the button to push on the back side in the center (top arrow).

Push the button and pull the key out of the fob at the separation, as shown to the right.

Starting Your Maserati

Maserati startStarting the car is a simple process. Touch the “nose” of the key fob to the Start / Stop button. Push the button with the fob itself while stepping on the brake as you normally would. The car will recognize the key fob and start even though the fob’s internal battery is dead.

Click here for a video rundown of the process, featuring the Ghibli.

——————————————————————-

Remember that only proper service and repair procedures will ensure the safe and reliable operation of your car. In addition, proper safety procedures and precautions, such as the  use of safety goggles, the right tools and the equipment should be followed at all times to eliminate the possibility of personal injury or improper service which could damage the vehicle or compromise its safety.

These posts are for information sharing purposes only, and should not be used in lieu of an OEM service manual or factory authorized service procedure. We are not in the auto repair business nor do we publish automotive service manuals. Nothing we include on these pages and posts has been reviewed, approved or authorized by any vehicle manufacturer.

Technology is always changing and what is current and accurate today may be literally out-of-date and inaccurate tomorrow. And when it comes to the current state of flux in the auto industry, nothing is more true.

Permanent link to this article: https://dashboardsymbols.com/2015/11/maserati-dead-fob-help/

Start a Hyundai, Genesis or Kia with a Dead Key Fob

How to Start a Hyundai, Genesis or Kia with a Dead Key Fob

Starting Your Hyundai, Genesis or Kia

Hyundai, Genesis and Kia use no less than seven different ways to start the vehicle if the Smart Key is weak or the Smart Key does not work correctly. However, the companies are migrating all their models to Method 6, smartly standardizing the process. That is until Genesis seemed to take a step back in 2021.

And if your start battery is still good, we’re going to get you going! Just follow along.

Kia/Hyun Start Style 6The latest models from all three manufacturers — with two exceptions — have a much simplified process. Staring with vehicle updates in the 2013 model year, simply press the Start / Stop ignition button with the Smart Key while depressing the brake to start the vehicle. We originally named this the back up start Method 6. If this does not work in your model, continue on below for a method that will.

EV button2021 Genesis G80 consoleThe exceptions noted are first, an EV button (far left) in Kia EVs. It is pushed just like the Start / Stop button. The second exception is the 2021 Genesis G80, which is now a Seventh Method. This method has moved to the 2022 GV60 EV as well, and may yet be placed in other models. If the vehicle does not recognize the key fob or Smart Key, slip the Smart Key into the space behind the shifter dial and cup holders and in front of the leather of the console. See the second image to the left. Then, step on the brake and push the Start / Stop ignition button to start the vehicle as normal.

Genesis charging padWe must also add an Eighth Method, which is digital. In the new GV60, G70, GV70, G80 and G90, a registered smart phone or a pre-registered card key can be placed on the vehicle’s wireless charging pad. It is found in front of the center console storage area (left). Once in place, the vehicle can be started as normal.

Kia/Hyun Start Style 1The Kia Forte, Sportage, and Sorento and Hyundai Sonata (prior to 2014) use Method 1. Insert the Smart Key in the Smart Key holder, which is a slot inside the center console, then press the Start / Stop ignition button while depressing the brake. To remove the Key, press it, then pull. Check out the video below.

Kia/Hyun Start Style 2The Kia Magentis also uses a slot in the center console in Method 2. Insert the Key and then press the Start / Stop ignition button while depressing the brake. To remove, press the Smart Key inward past the detent and then pull it outward.

Kia/Hyun Start Style 3The Hyundai Genesis, built before 2014, uses Method 3, which is a slot located behind a door above the shifter. Insert the Key and then press the Start / Stop ignition button while depressing the brake. To remove the Key, press it and then pull it out.

Kia/Hyun Start Style 4The Kia Optima (prior to 2014) and Soul and Hyundai Equus use Method 4, which is a slot in the glove box. The slot is a little higher in the Equus. Insert the Key and then press the Start / Stop ignition button while depressing the brake. To remove the Key, press it and then pull it out.

Kia/Hyun Start Style 5The Kia Borrego uses the Method 5 slot, which is in the dash just below the Start /Stop ignition button. It should be readily visible. Insert the Smart Key and then press the Start / Stop button while depressing the brake. To remove the Key, release it by pressing and then pull it out.


Note: If you have made an attempt to start the vehicle without success, there may be residual pressure in the brake system and a new warning light may appear (left) or text Engine Start Operation Indicatormessage to Step on the Brake. Press the brake pedal very, very hard when trying to start the vehicle again to be sure that the release switch behind the pedal is engaged. Or wait a few minutes and try again.

Video Help

Click here for videos to walk you through the processes.

… Return to Part I, Getting In

——————————————————————-

Remember that only proper service and repair procedures will ensure the safe and reliable operation of your car. In addition, proper safety procedures and precautions, such as the  use of safety goggles, the right tools and the equipment should be followed at all times to eliminate the possibility of personal injury or improper service which could damage the vehicle or compromise its safety.

These posts are for information sharing purposes only, and should not be used in lieu of an OEM service manual or factory authorized service procedure. We are not in the auto repair business nor do we publish automotive service manuals. Nothing we include on these pages and posts has been reviewed, approved or authorized by any vehicle manufacturer.

Technology is always changing and what is current and accurate today may be literally out-of-date and inaccurate tomorrow. And when it comes to the current state of flux in the auto industry, nothing is more true.

Permanent link to this article: https://dashboardsymbols.com/2015/01/hyundai-and-kia-dead-key-fob-help-part-ii/

Open and Start a Subaru with a Dead Key Fob

How to Open and Start a Subaru with a Dead Key Fob

Getting into Your Subaru

Retrieving the Mechanical Key

Subaru uses three different styles of Access Key fobs (remote controls or Subaru Key Style 1‘clickers), each of which holds a mechanical key. The rectangular shape Style 1 has a release catch (1) on the mechanical key (2) itself, very near the key ring hole, as shown. Slide the catch towards the hole while pulling on the key to remove it from the Access Key.

There’s plenty more below and video help here

Subaru Key Style 2The Style 2 Access Key has an oval shape. The release for the mechanical key (2) is a simple push-button (1) on the back of the Access Key, as shown (for the record, it looks like it will slide — it won’t). Pull out the mechanical key while pressing the release button at the same time.

Finally, a limited number of Subarus feature a Style 3 Access Key, Subaru Key Style 3which is also a more rectangular shape. Here, the mechanical key release (1) is on the side of the Access Key, as shown.  Pull out the mechanical key (2) while pressing the release button at the same time.

Starting Your Subaru

Regardless of which Access Key or key fob in hand, the starting process for Subaru vehicles is the same. Hold the Access Key or key fob against the Start / Stop ignition switch with Subaru Emergency Startbuttons facing out towards you, as shown. The vehicle and the Access Key will talk to each other for a few moments, after which a chime or ‘ding’ will be heard.

The Start / Stop ignition has now been switched to the “ACC” or “ON” position. With the brake pedal still depressed, push the Start / Stop button to start the engine. Like similar systems from Toyota and Hyundai, etc., you might opt to simply push the button with the key fob to start it.

Note: If you have made an attempt to start the vehicle without success, there may be residual pressure in the brake system and a new warning light may appear (left) or text Engine Start Operation Indicatormessage to Step on the Brake. Press the brake pedal very, very hard when trying to start the vehicle again to be sure that the release switch behind the pedal is engaged. Or wait a few minutes and try again.

Finally, check our Videos for additional help.

——————————————————————-

Remember that only proper service and repair procedures will ensure the safe and reliable operation of your car. In addition, proper safety procedures and precautions, such as the  use of safety goggles, the right tools and the equipment should be followed at all times to eliminate the possibility of personal injury or improper service which could damage the vehicle or compromise its safety.

These posts are for information sharing purposes only, and should not be used in lieu of an OEM service manual or factory authorized service procedure. We are not in the auto repair business nor do we publish automotive service manuals. Nothing we include on these pages and posts has been reviewed, approved or authorized by any vehicle manufacturer.

Technology is always changing and what is current and accurate today may be literally out-of-date and inaccurate tomorrow. And when it comes to the current state of flux in the auto industry, nothing is more true.

Permanent link to this article: https://dashboardsymbols.com/2014/11/subaru-dead-key-fob-help/

Open a Fisker with a Dead Key Fob

How to Open a Fisker with a Dead Key Fob

  • But first, if you are already inside, click here for help getting started!
  • And if you need or want another manufacturer, click here.

Retrieving the Karma’s mechanical key

Fisker introduced the range-extended electric Karma in 2011. The company went broke but has since returned with the all electric Ocean. They’re on the fiscal ropes again.

There aren’t too many on the road, but if you have one and need to get in and get started when its key fob dies, this is the place to be.

Fisker Karma fobFor the Karma model, press the button on the reverse of the key fob (remote control or ‘clicker’) and slide the emergency key blade or mechanical key free (right image).

Insert the key into the lock located beneath the passenger side door handle. This will set off the vehicle’s alarm. We do not know if this will unlock the driver’s door as well, Karma unlockwhich could make getting to the next step very difficult while an alarm is blaring.

See the emergency start procedure on the next page. The alarm will will be turned off when the vehicle is started.

Getting into the Fisker Ocean

The Ocean’s key fob does not have a mechanical key, but there is still a back up opening procedure.

Ocean door handlePlace the Fisker logo on the back of the fob against the light colored strip in the center of the driver’s door handle roughly where the arrow is pointing (right). It may need to be moved a half inch one way or the other. The handle will detect the key fob and will extend to the open position.

——————————————————————-

Remember that only proper service and repair procedures will ensure the safe and reliable operation of your car. In addition, proper safety procedures and precautions, such as the  use of safety goggles, the right tools and the equipment should be followed at all times to eliminate the possibility of personal injury or improper service which could damage the vehicle or compromise its safety.

These posts are for information sharing purposes only, and should not be used in lieu of an OEM service manual or factory authorized service procedure. We are not in the auto repair business nor do we publish automotive service manuals. Nothing we include on these pages and posts has been reviewed, approved or authorized by any vehicle manufacturer.

Technology is always changing and what is current and accurate today may be literally out-of-date and inaccurate tomorrow. And when it comes to the current state of flux in the auto industry, nothing is more true.

Permanent link to this article: https://dashboardsymbols.com/2012/04/fisker-dead-key-fob-help/

Open a Volvo or Polestar with a Dead Key Fob

How to Open a Volvo or Polestar with a Dead Key Fob

Retrieving the mechanical key

Three key fob or remote key or remote control styles are in play for Volvo. With new ownership and a redesign of the XC-90 in 2016 and spreading into other models as they are updated, including the first new Polestar models, comes a new key fob style.

It should be noted that in 2021, a smart phone app became available for both Volvo and Polestar models and can be used to open and start these vehicles. A key card is added beginning in 2024.

Volvo Key Style 2As we noted, beginning with the 2016 Volvo XC-90 redesign as well as all Polestar models, a new style key fob is used (right). To retrieve the mechanical key or key blade, look for a slide lever on the top of the key ring end of the fob. This will free the front cover, which needs to be removed.

Volvo Key Blade 2To do this, push the cover slightly down and away from the key ring end. It can then be pulled up and out, exposing the mechanical key. The key blade can then be lifted out.

The key holes on most models may not be immediately visible, but help with that can be found below.

Volvo KeyWith the previous generation key fobs, the is pulled away from the fob rather easily. Slide the spring loaded catch on the back of Remote Key (remote control or ‘clicker’) to the side. Pull the key blade straight out of the remote key. On some models, the lock cylinder (keyhole) at the back of the door handle will be visible. If so, use the key blade to unlock the door. See below if the key hole is hidden.

Early Volvo key fobWith the first generation Remote Key, a similar spring loaded catch will be found on the top of the fob, on the key ring end. As with the fob above, slide the catch to the side and pull the mechanical key away. Again, the lock cylinder (keyhole) at the back of the door handle may or may not be visible. See below if the key hole is hidden.

Getting Inside

Note: Unlocking the vehicle with the mechanical key will set off the alarm. Following the start procedure will also turn off the alarm.

Volvo Style 2 LockIn the Volvo XC-90 and other redesigns going forward since 2016, as well as the Polestar 2, the key hole is also hidden, but easily found and nothing needs to be removed. Simply pull the door handle out as far as possible and the key hole is exposed, as shown in the image.

Insert the mechanical key (it may be awkward to get at) and turn it clockwise to unlock. Remove the key blade and release the handle. Pull the handle once again and you are in the car.

LC500 key holeThe Polestar 1 features a door handle that is flush to the car’s body. Push the front of the handle inward and pull away the back, as seen to the right. The key hole is now exposed. As above, insert the mechanical key and turn it clockwise to unlock. Remove the key blade and release the handle. Pull the handle once again and you are in the car.

Polestar 4 back up entryPolestar-3 door handleA mechanical key is not available to unlock the Polestar 3 or Polestar 4. The smart phone app or the vehicle’s key card will be needed. With the Polestar 3, the card is touched to the front of the driver’s door handle (right). With the Polestar 4, the card is touched to the middle of the door pillar just behind the driver’s door (far right).

The app simply uses a tap on the screen.

For older Volvo models, if the keyhole at the back of the driver’s door handle is hidden, follow the next set of instructions.

Volvo Keyhole CoverPress the key blade about a half inch straight up in the hole on the underside of the keyhole cover (right), found at the back of the driver’s door handle. This action will force off the cover. If you are in the dark, you may need to feel for the hole. Yes, you must remove a piece of the car, but it is ok and necessary. Use the mechanical key in the now-exposed lock to unlock the driver’s door.

Continue to Part II, Getting Started …

——————————————————————-

Remember that only proper service and repair procedures will ensure the safe and reliable operation of your car. In addition, proper safety procedures and precautions, such as the  use of safety goggles, the right tools and the equipment should be followed at all times to eliminate the possibility of personal injury or improper service which could damage the vehicle or compromise its safety.

These posts are for information sharing purposes only, and should not be used in lieu of an OEM service manual or factory authorized service procedure. We are not in the auto repair business nor do we publish automotive service manuals. Nothing we include on these pages and posts has been reviewed, approved or authorized by any vehicle manufacturer.

Technology is always changing and what is current and accurate today may be literally out-of-date and inaccurate tomorrow. And when it comes to the current state of flux in the auto industry, nothing is more true.

Permanent link to this article: https://dashboardsymbols.com/2012/04/volvo-dead-key-fob-help/